High Performance Components by Powder Metallurgy
Abstract
This paper will describe the manufacturing process for the production of components that are currently processable by powder metallurgy. Powder and alloying technology, compacting and sintering will be presented. The mechanical properties will be discussed and how they are influenced by the processing conditions of sintering (dew point, cooling rate, atmosphere etc.). Fundamental knowledge in the materialography (i.e. metallography) shows that the interpretation of the microstructure is a good understanding for the sintering process permits to increase the mechanical properties.
Introduction
Ferrous powder metallurgy (P/M) has advanced significantly over the past thirty years as a cost effective and efficient processing technique to make intricate near net shape parts. Parts made by P/M compete favourably, in terms of cost, recycling environment and properties, with conventional processing techniques such as stamping, casting and forging. The elimination or minimization of secondary operations (such as machining) makes P/M an attractive processing technique.
Powder, chemical composition of the powder, compacting and sintering have a big influence on the mechanical properties of the components [1-4].
The implementation of iron and steel powders metallurgy for many automotive applications, for example synchronizing hubs, synchronizing rings, sliding sleeves, clutch cones, have led to the development of new high-performance materials (like FeCrMoC, FeCrC, FeNiMoCuC). In order to utilize these materials in an optimal way, one of the major requirements is the fatigue performance. The various degree of homogeneity of the microstructure can influence the fatigue performance of the material. The sintering conditions can be modified to improve the microstructure and for this reason the fatigue strength.
The metallographic specimens were examined by light optical microscopy (LOM) at polished and etched conditions. The micro-sections were etched with a nitrate solution.
Powder
Iron powder
Iron powder can be divided in two different powders:
Sponge iron powder
Used is a magnetite slick (Fe3O4) and reduction mix of coke breeze and limestone (Höganäs Process) [5]. Grinding, screening and annealing in belt furnace and equalizing are the different steps of the production of the powder with a particle size below 150 µm. The powder has a god strength but a low compressibility and is used for component with a density of < 6.8 g/cm³.
Water atomized powder
After melting and atomizing with water jets, the powders are harder than desired because of the extremely rapid cooling during atomizing. Dewatered, dried, magnetically separated, screened are the next steps before a heat treatment. To soften them and to reduce oxygen and carbon content, powders are annealed in a controlled atmosphere. This powder is high compressive with a medium particle size of about 85 µm and used for components like sleeding sleeve, synchronizer hub, synchronizer ring with a density > 6.8 g/cm³.
Effect of Alloying Elements
In order to achieve hard enable sintered ferrous materials, carbon and other alloying elements have to be added like copper, nickel, molybdenum, chromium, manganese, silicium. For pressed-and-sintered PM components, the effect of alloy elements as well as the mode of addition (admixed, pre-alloyed, or diffusion-alloyed) on each of the blending, compacting and sintering steps are very important.
Carbon (0.1-0.7 wt.-%)
The principal element for steel and PM steel. Due to the rising in temperature of the martensitic transformation the carbon increases tensile strength and hardness but decreases consequently the elongation. For a concentration > 0.8 wt. -% the formation of residual austenite takes place and the tensile strength decreases.
Nickel (1-4 wt.%)
Increase strength, impact resistance, fatigue strength and has a good abrasion resistance. A shrinkage during the sintering can been observed.
Molybdenum (0.4-1.4 wt.-%), chromium (0.5-3.0 wt.-%)
Alloying elements such as chromium, molybdenum are added to iron with carbon to improve properties such as hardness, strength and toughness.
Copper (1.0-3.0 wt.-%)
Increase hardness, strength. Generally, in combination with others alloying elements. Copper and graphite additions cause growth in the sintered compact.
Manganese (0.1-2.0 wt.-%)
Increase strength and hardness in combination with molybdenum.
Silicon (0.5-3.0 wt.-%)
The addition of silicon to iron has benefit influence on the magnetic properties of iron. Silicon increases the resistivity and decreases the saturation induction. Liquid phase takes place during the sintering.
Phosphorus (usually 0.45 wt.-%)
The addition of phosphorus to iron has a positive influence on the soft magnetic properties. The element stabilizes the more open alpha-phase and forms a liquid phase about 1050 ℃. The sintering take place at the commonly used temperature of 1120 ℃. Phosphorus causes an increase in saturation induction, a decrease in coercive field and a rise in resistivity.
Alloying technology
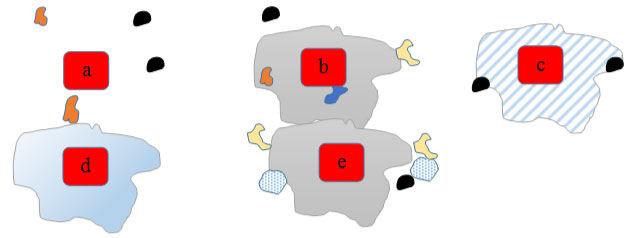
The addition of the alloying elements to improve the mechanical properties of pure iron i.e. strength, hardness, ductility, impact resistance, fatigue strength is very important for the production of components. A graphical representation of the different alloying technology is represented in the Figure 1.
Powder characterization
The behaviour of metal powders during the manufacturing largely depends upon the characteristics of the powder, which can be characterized by three categories of properties:
1. Metallurgical properties: chemical composition and impurities, microhardness
2. Geometrical properties: particle size distribution, particle shape
3. Mechanical properties: flow time, compressibility, spring back, apparent density, fill factor
4. The characteristics of the powder decide about its compacting and sintering behaviour and the mechanical properties.
Compacting
After metal powders are mixed with lubricants (for example wax between 0.4 and 1.4 wt.-%) and graphite - the nomination of the mixture is Premix - the mixture is fed into a precision die and compacted usually at room temperature [1,5,6]. Normally pressures in the range 400 to 700 MPa are used to achieve the desired green density. The green density and green strength of a component depends on compacting pressure, on component geometry and on composition of powder. Prealloyed powders have a high compressibility in comparison to completely alloyed powder.
Sintering
The properties of compacted specimen, which provide to metal powders, are unattractive. The strength is with 15-20 MPa too low for industrial applications. Sintering is the process whereby particles bond together at temperatures typically below the melting temperature by atomic transport events to improve the properties. A characteristic of sintering is that the rate is very sensitive to temperature and protective atmosphere to avoid an oxidation of the compacted powder particles [7,8].
Protective atmosphere
The behavior of the different gas in a sintering furnace has been mentioned in the Table 1. The fig shows that the water vapor condense, the carbon dioxide and oxygen has oxidizing-decarburizing effect and hydrogen reducing and carbon monoxide reducing-carbonizing. The carbon monoxide can be converted to carbon dioxide. Nitrogen, Argon and Helium are usually considered like inert atmospheres. Only argon and helium are inert in the sense they do not react chemically. Argon and helium have been rarely used as furnace atmospheres because of their high cost [8].
Nitrogen is not reactive, although the stability of the N2 molecule normally makes it. Usually parts are sintered in nitrogen-hydrogen protective atmosphere containing a hydrogen between 10 and 30%. That atmosphere is generally introduced in the transition zone located between the high heat zone and cooling zone of the furnace. The flow of the N2-H2 atmosphere is selected so that the atmosphere eliminated the infiltration of air into the furnace [7-10].
The Figure 2 shows the influence of the temperature and of the dew point or water vapor content for reduction of various oxides in pure hydrogen. The dew point is a measure of the water to hydrogen partial pressure ratio and gives the temperature at which water vapor condense. A dew point of 6 ℃ corresponds to 1 volume % water content in the atmosphere. The advantage of the diagram is that it gives the profile line for the oxidizing- reducing of the alloying elements. The line of the metals situated at low dew point has the great affinity to oxygen and for this reason, the sintering conditions are more important for the obtainment of good sintering necks, which lead to high performance mechanical properties.
Sintering furnaces
Continuous furnaces used in large scale sintering in protective atmospheres of structural parts are listed in the Table 2.
The furnace type and dimensions depend on the production quantity, chemical composition of the PM steel, operation costs, type of atmosphere, cooling rate [11].
Due to a high productivity, the mesh belt furnace with a sintering temperature of 1120 ℃ is generally used for the sintering of many specimens made of PM steels. Two different protective atmospheres can be used - endothermic atmosphere or a mixture of Nitrogen - Hydrogen (80-20 or also 95-5 volume%). PM steels with high or low carbon content can be sintered in this furnace.
For sintering condition with a temperature > 1120 ℃, for example for PM steels with a high content of Chromium or for soft magnetic PM steels, the walking beam furnace and the roller furnace are recommandable because for the sintering process of these PM materials a dew point < -25 ℃ is necessary.
During the sintering process a wide variety of physical, chemical and metallurgical phenomena occur within the mass of metal powder particles. These effects have been influenced by the sintering conditions and by the sintering atmosphere. The typical process control factors for a furnace that are recognized in order to produce good reproducibility of the quality of the sintering parts are the following:
1. Measure of the sintering temperature
2. Measure of the dew point
3. Measure of the oxygen content with an oxygen sensor
4. Furnace temperature profile
5. Furnace cooling rate
6. Furnace atmosphere volume and composition
7. Atmosphere location and direction
The sintering process has been divided into three steps (Table 3).
The effect of the sintering manufacturing conditions on the formation of necks between the particles powder on the formation of the microstructure and on the cooling rate have been described in the three following examples:
1. Influence of the protective atmosphere on the sintering necks.
2. Influence of the sintering temperature and the protective gas for P/M FeSi.
3. Influence of the cooling rate on the hardness and on the microstructure.
Influence of the protective atmosphere on the sintering necks
To interpretive the effect of the quality of the protective atmosphere on the formation of good sintering necks the PM material with the chemical composition FeCrNi was studied.
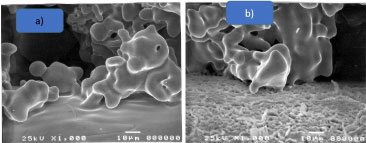
The protective atmosphere with a reducing character permit to create the formation of solid sintering bridges or necks between the metallic surfaces of the particles (Figure 3a). In this case the dew point in the sintering zone is about -25 °C it signifies that the quantity of water vapor in the sintering atmosphere is very low.
An oxidation of the iron chromium powder surface particles (Figure 3b) during the sintering process with a dew point -10 °C hinder diffusion bonding and the development of the adequate mechanical properties. The atmosphere composition and specially the water vapor condense is responsible for this effect [11].
Influence of the sintering temperature and the protective gas for P/M FeSi
The main application of Fe-3Si material is in the field of soft magnetic materials for alternative current application [11,12]. The P/M Fe3Si is produced by pressing and sintering. The sintering temperature takes place at 1120 ℃ under endothermic protective atmosphere (Figure 4a), at 1120 ℃ under nitrogen-hydrogen (Figure 4b) and at 1290 ℃ under nitrogen-hydrogen (Figure 4c) [11].
To illustrate the effect of the sintering conditions at various temperatures, a microstructural examination of the samples have been evaluated. The three microstructures of the (Figures 4a, Figure 4b and Figure 4c) illustrate clearly the effect of the sintering temperature and of the protective gas on the homogenization of the matrix.
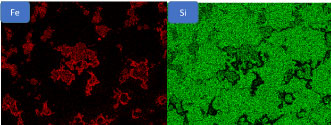
The microstructure of the Figure 4a shows a mixture of ferrite and pearlite - A carburization takes place during the sintering process due to the endothermic protective atmosphere with the presence of a little quantity of a carbon gas. In contrary of this, in a proper protective atmosphere nitrogen-hydrogen the microstructure Figure 4b consists of a pure ferrite. The sintering at 1120 ℃ shows that the silicon-iron particles are not homogeneously distributed in the matrix (Figure 5). The intensity of the red coloration is an enrichment of Iron silicon power particles that are not dissolved in the matrix due to the low sintering temperature at 1120 ℃.
At a sintering temperature of 1290 ℃ the pores are well rounded, smooth pores and no evidence of presence of silicon particles (Figure 4c). The silicon enrichment are reduced and for this reason the silicon is homogeneous distributed in the matrix [11,13,14].
Influence of the cooling rate on the hardness and on the microstructure
The base powder used to determine the influence of the cooling rate [11,152,16] on the hardness and microstructure was the powder Fe-(1.8Cr 0.8C) with the commercial name Astaloy CrA from the company Höganäs AG. It is a water atomized pre-alloyed powder with chromium. The procedure reduces the sensibility to oxidation and permits to sinter this PM material in a mesh belt furnace. Considering the environment the properties of this material were examined without the addition of the alloying elements nickel and copper. Tensile bars were compacted at a green density of 7.0 g/cm³ and sintered for 20 min. in a mesh belt production furnace under a protective atmosphere of Nitrogen/Hydrogen.
Hardness and microstructure
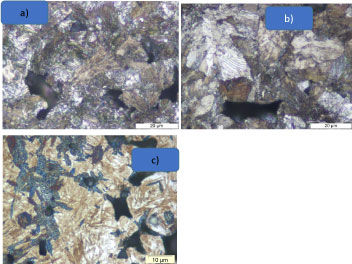
The influence of the cooling rate between 900 ℃and 300 ℃ by the sintering temperature 1120 ℃ was determined. Figure 6 shows the microstructures corresponding to three different cooling rates for the material Fe1.8Cr 0.8C. It is obvious that the cooling rate influences the microstructure [17] with increasing cooling rate the amount of martensite increases.
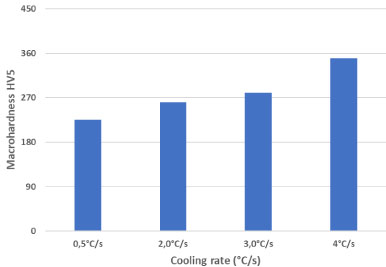
The determination of the macrohardness permits to evaluate the correlation between the microstructure and the hardness. The variation in the microstructure corresponds to the variation in the macro hardness HV5. The hardness varies in the range of 230 to 350 HV5 (Figure 7). The table shows clearly that with an increase of the cooling rate, the hardness increases due to the formation of predominately martensitic microstructure with very fine pearlite that gives a good elongation. It does not appear a full martensitic structure. For this reason a treatment thermique like annealing at 200 ℃ is not necessary for this PM material (Fe-1.8Cr 0.8C).
Fatigue Behavior of Fe 1.8Cr 0.8C
The cooling rate has also a big influence on the fatigue behavior of the PM material and this is important for the dynamic properties of the specimen like synchroniser hub, sliding sleeve for example. The determination of the fatigue curve is for this reason absolutely necessary and can be considered for the design of the specimen.
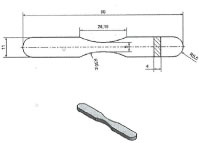
Fatigue bars were compacted to a green density of 7.0/cm³ for the five powders to produce unnotched fatigue bars (Kt = 1.0) according to the ISO 3928 shown in Figure 8. Fatigue tests were carried out in the axial loading mode which is more severe than bending. The frequency was f = 35s-1. A stress ratio was investigated on the unnotched specimens under fully reversed loading R = σ min / σ max = -1 using 20 specimens for the determination of the S-N (Woehler) curve. The curves, presented in terms of nominal amplitude stress σ and cycles to rupture N were statistically evaluated for the probabilities of survival Ps = 10%, 50% and 90% in a logarithmic Gaussian distribution. The fatigue test were performed at the Fraunhofer Institut LBF, Darmstadt, Germany [18].
Sintering with and without rapid cooling was carried out in a mesh belt production furnace at 1120 ℃ in a nitrogen-hydrogen based atmosphere.
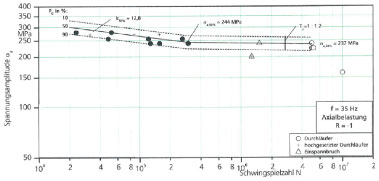
Figure 9 presents S-N curve evaluating the fatigue performance of the Fe1.8Cr0.8C after a cooling rate of 3-4 ℃/s. The microstructure consists of martensite and bainite and the macro hardness value is 300 HV5 [2, 18].
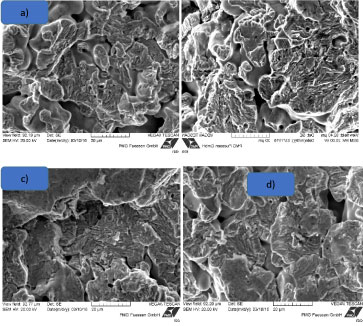
As shown, the endurable nominal stress amplitude at 5.106 cycles with a probability of survival of Ps = 50% is equal to 237 MPa and the mean slope k is equal to 12.8. In order to detect the formation of the fatigue a SEM (scanning electron microscope) investigation of the fracture surface was carried out. Figures 10a, Figure 10b, Figure 10c and Figure 10d show the fracture surfaces of the material after different cycles to rupture [18]. The fracture surface can be divided in three principal fracture types depending on the stress amplitude i.e. on the number of cycles to rupture:
1. High stress amplitude (> 260 MPa) - very low number of cycles to rupture (< 20.000): The start of the fracture shows a fracture fatigue with a big area of ductile fracture.
2. Stress amplitude between 240 and 260 MPa - number of cycles to rupture 20.000-1.106: The fracture consists of a mix fracture with fatigue fracture and small trans granular cleavage facets of the powder particles.
3. Low stress amplitude (< 240 MPa)-very high number of cycles to rupture (> 1. 106): Start of the fracture shows s big surface with fatigue and a little area with ductile fracture.
The results of the fatigue behavior after different cycles are summarized in the Table 4. The SEM examination of the morphologie of the fracture surface permits to evaluate the influence of the cycles and of the stress amplitude.
Conclusion
High performance
This paper is a overview of the characteristics of the powder metallurgy. Powder specifies, compaction and principally a description of the sintering process with the goal of the three zones (dewaxing, sintering, cooling) was discussed. The three examples show clearly that the choice of powder and the sintering conditions have a big influence on the mechanical properties of the specimens. A metallographical examination is necessary to explain, to understand and to ameliorate the mechanical properties in the sintering state.
A significant improvement in material properties is achieved by using cooling system during the sintering step.
A wide variety of properties in the end-product can be achieved depending on the choice of the powder and on the sintering processing.
Typical specimens made of Fe-1.8Cr 0.8C are specimens for synchroniser systems with high performance.
References
- German RM (1984) Powder Metallurgy Science. Metal Powder Industries Federation, Princeton, New Jersey.
- German RM (1996) Sintering theory and practice. Solar-Terrestrial Physics (Solnechno-zemnaya fizika), 568.
- German RM (2013) Liquid phase sintering. Springer Science & Business Media.
- German RM (2005) Powder metallurgy and particulate materials processing: The processes, materials, products, properties, and applications. Princeton, 20-56.
- (1997) Handbook for Sintered Components. Part 1: Material and Powder Properties, Höganäs, 2-9.
- Lenel Fritz V (1980) Powder metallurgy-principles and applications. Metal Powder Industries Federation, Princeton, New Jersey.
- Chan WH (1956) A dew point temperature diagram for metal-metal oxide equilibria in hydrogen atmospheres. Welding Journal Research suppl 35: 622-624.
- Bocchini GF (2004) Influence of controlled atmosphere on the proper sintering of carbon steels. Powder Metallurgy Progress 4: 1-28.
- Durdaller C (1972) Furnace Atmospheres-Technical Bulletin D174. Hoeganaes Corporation.
- Jones WD (1960) Fundamental Principles of powder metallurgy. London, 546.
- Delarbre P, Hornof B (2018) Influence of the sintering conditions on the properties of PM materials. Int J Metall Met Phys 3: 013.
- Jang G, Drozda M, Danninger H, et al. (1984) Sintering behavior, mechanical and magnetic properties of sintered Fe-Si materials. The international Journal of Powder Metallurgy & Powder Technology, 20: 287-300.
- Delarbre P, Schoppa A (2015) Einfluss der Sinterbedingungen auf die Mikrostruktur und die Eigenschaften von Sinterstählen. Pulvermetallurgie in Wissenschaft und Praxis, Fachverband Pulvermetallurgie 31: 181-193.
- Gonzalez F, Houbaert Y (2013) A review of ordering phenomena in iron-silicon alloys. Revista de Metallurgia, 49: 178-199.
- James W Brian (1998) What is sinter-hardening? International Conference on Powder Metallurgy & Particulate Materials, Las Vegas.
- Delarbre P, Sigl LS (2004) Sinterhärten von PM Stählen Grundlage und praktische Anwendung Pulvermetallurgie in Wissenschaft und Praxis. Fachverband Pulvermetallurgie 31: 179-193.
- Delarbre P, Schoppa (2015) A influence of sintering conditions on the microstructure and properties of sintered steels materials. EURO PM, Reims, France.
- Delarbre P, Schoppa A, Hornof B (2016) Relationship between microstructure and mechanical properties of iron -1.8 chromium PM materials. Metal Powder Report 71: 344.
Corresponding Author
Ing Patrice Delarbre, PMG Fussen GmbH, Hiebelerstrasse, Fussen, Germany.
Copyright
© 2019 Delarbre IP, et al. This is an open-access article distributed under the terms of the Creative Commons Attribution License, which permits unrestricted use, distribution, and reproduction in any medium, provided the original author and source are credited.

